The following post was written by Carlos Ralli Ucendo. We would like to thank him for his helpfulness and his collaboration.
FIWARE Lab enables you to connect IoT devices in a private environment for your own Apps exploitation, but it also enables you to connect and share them publicly available for any other developer interested. This article focuses on the later approach, although it might work well as a learning exercise for the other goal.
The following diagram depicts the components in the FIWARE Lab for most IoT scenarios.
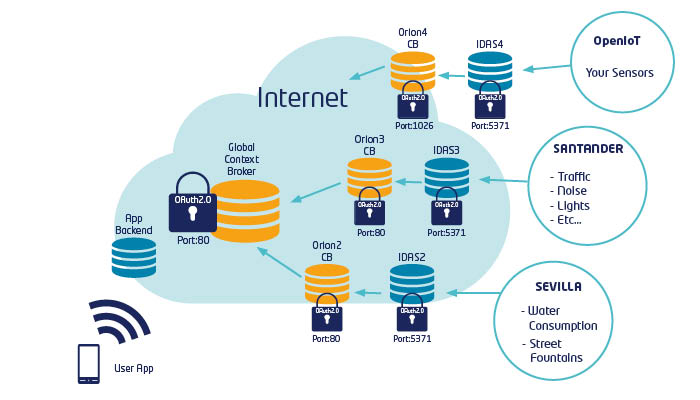
Our exercise today will focus on IDAS4, Orion4 and the Global ContextBroker enablers:
- IDAS4 is the component you will use to register your devices and send their observations (measurements). IoT Providers are organized in “Services”, for instance the Smartcity of Seville will use an specific service. For public sharing, we use a specific service called “OpenIoT”.
- Orion4 is the ContextBroker where all the data of “OpenIoT” service will be sent. Therefore anyone may access the Data of your IoT devices accessing his component.
- Global ContextBroker: All the Context data at Orion4 is sent to the Global ContextBroker, which is a single access point for your data plus all smartcities connected to FIWARE.
To configure and connect your devices to IDAS4 there are three basic steps to cover:
- Create a Model. All devices are based in models. We provide several models you can reuse and you may create your own ones too.
- Register a Device+Asset. The platform needs to know your device before observations are sent. You need to clarify the Model the device is based on, a “Device ID” (that will be used in the southbound of IDAS4) and the “Asset ID” (that will be used in the Northbound of IDAS4 and therefore in the ContextBroker). The reason to have Device and Asset IDs is to decouple a physical device from a logical device. For instance, you may have “Vendor:model:Unique_ID” as “Device ID” and “Temperature_Garden_Ground” as asset name which is more meaningful and does not need to be changed if later on the physical device is replaced due to a failure or evolution.
- Send Observations/Measurements. For devices to be able to send measurements to a service, for instance “OpenIoT” at IDAS4, a shared secret that we call API-KEY needs to be known. For OpenIoT is “”.
Later on you can read the last status and subscribe to changes of the devices at the ContextBroker. You may use Orion4 or the Global ContextBroker for that.
IDAS4 and ORION4 expose easy-to-use REST APIs that are well described in this presentation:
However, to speed up the process we will use the FIGWAY tools available at:
https://github.com/telefonicaid/fiware-figway/
These are basically tools to interact with IDAS and the ContextBroker written in Python2.7, so you can easily run them on many gateway platforms, such as a RaspberryPI, but also you may run them in a computer (MACOS, Linux or anyone with python) and play with virtual sensors too.
Getting started is extremely easy. For a first exercise, let’s create a virtual temperature sensor in a few steps:
1. FIWARE Lab account set up
Get to https://account.lab.fi-ware.org and register as user if you didn’t before.
2. Obtain a valid Ouath2.0 token
IDAS4 and Orion4 are obviously protected to avoid malicious usage and therefore access to them is protected with an Identity Proxy that can only be traversed if your request holds a valid Token in the HTTP headers.
Obtaining your Token is easy, just run the “python/GetToken.py” script. You will be prompted for your FIWARE account and password and a valid token for you will be printed in the screen (copy and paste it for use it in the next step). Token will expire after sometime but you’ll be able to use it for some days at least.
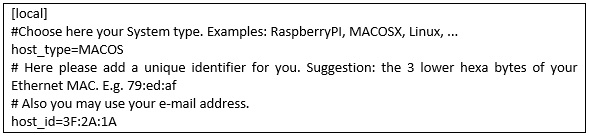
3. Configure python/config.ini file
Edit config.ini file and configure the following section with your FIWARE account username and the Token you obtained in the previous step:

Also configure the section identifying your computer, gateway or device. You just need to provide the system type and a unique identifier (recommended last 3 bytes in hexa of a MAC address or your FIWARE username). I included some fake ones for this example.
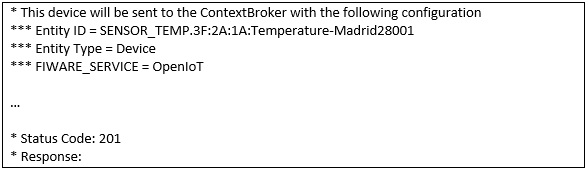
4. Register your Device
Run:
![]()
Note that the first argument is a generic model for a temperature sensor available at OpenIoT service, “Sensor1” is the name we choose for our physical device and “Temperature-Madrid28001” is a more meaningful name for App developers willing to use my outdoor temperature sensor (by including city and ZIP code).
Running this script will provide you with the actual IDs associated to your device (the prefix of your host identifier in the config.ini file is used as a prefix so you can easily look for your devices in the IDAS4, Orion4 or the Global ContextBroker later on).
5. Send Observations/Measurements
Once the device is registered, we can send new data, for instance temperature = 25, with:
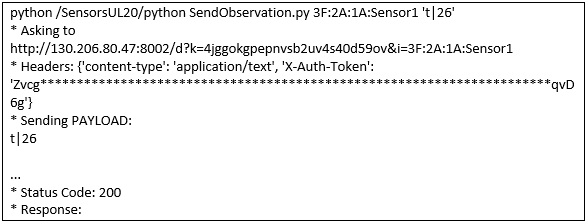
Note that the first argument is the Device ID obtained as the result of the script in the previous step and ‘t|26’ is a payload composed by ‘[Measurement alias]|[value]’. Measurement aliases are the way to reduce the observation payload and they are described in the Model used to register the device.
6. Reading your data:
Sensor data is accessed at the ContextBroker. You may use FIGWAY scripts for that too:
![]()
Note that the first argument is the Entity ID that was provided to us when registering the device, that is based in the Asset name which is thought to be more meaningful for other developers than the Device name.
The ContextBroker offers you the possibility to subscribe to changes in Entity’s attributes. This way your App may get subscribed to changes in a specific observation of your devices. FIGWAY tools at “python/ContextBroker” folder allow you to test subscriptions with the “SetSubscription.py”, “SubscriptionDaemon.py” and “SubscriptionHandler.py” scripts, please read “README.md” file for more information on this.
What if I want to create other kind of sensors?
The step is to check whether there is a suitable available model for your purpose in the IDAS4 service we are using (“OpenIoT”). This might be done this way:
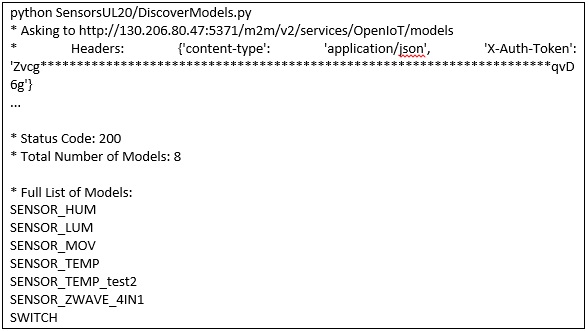
Once you know available models, you may check details of each one:
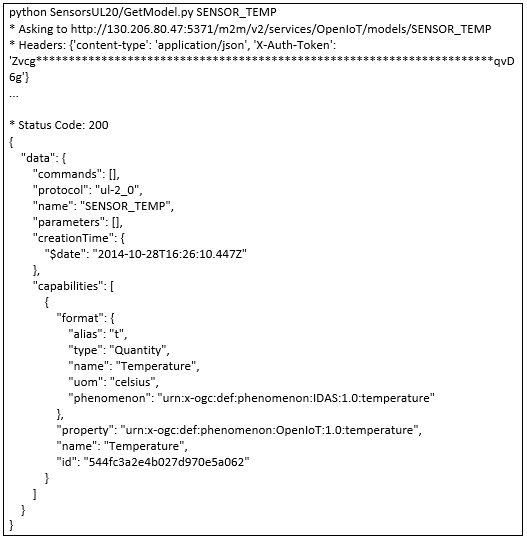
If finally you conclude there is no suitable Model for your specific IoT device, you may create your own by creating your model at “python/SensorsUL20/models” folder (check examples provided in that folder) and then run:
![]()
Where MODEL_FILE is the file holding the new model you want to create that must be located in the “/SensorsUL20/models” folder.
How to connect physical sensors instead of virtual ones?
The process is exactly the same as for the virtual sensors. Actually you can perform all those steps from your computer and just send the observations (step 5) from your IoT devices.
How you adapt step 5 to your specific platform is highly dependent on your IoT hardware/software. For instance, if your platform supports python2.7 you may just copy (and adapt if needed) the script SendObservation.py.
However, several platforms might not support a Python2.7 environment so you need to perform the HTTP post on your own. Just take into account:
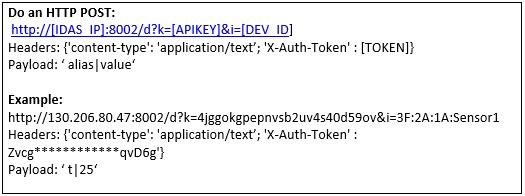
What if I want to connect an actuator?
Maybe you are connecting a device that is capable of receiving commands (an actuator). Actuators can be synchronous (they receive the commands immediately) or asynchronous (they ask IDAS for pending commands from time to time).
Synchronous sensors need to implement a server to receive commands and their network connectivity needs to allow it, which is not always easy as long as they are behind a firewall and/or NAT with private IP addresses.
IDAS and FIGWAY tools support both types of sensors, but we will explain in this section only the asynchronous case as long as it is the one IDAS provides more added-value. We call this case “pooling commands”.
So let’s imagine we have got a switch that is driving a LED Lamp with the 3 RGB colours. The switch needs to receive commands in the form of “Get R-G-B” where R, G and B are numbers from 0 to 99 related to the intensity of each basic color.
Let’s assume also that the switch does not need to drive the lamp immediately after a command is issued but only needs to be updated every 5 minutes (asynchronous operation).
Let’s imagine the switch is connected to a RaspberryPI running FIGWAY tools and deployed in a private IPv4 network. Let’s assume it is connected to the Internet through and ADSL connection and the ADSL router runs a NAT to connect it all to the public Internet.
The first thing we would do is to create the device/asset with the model “SWITCH”, which is already available at the OpenIoT service.
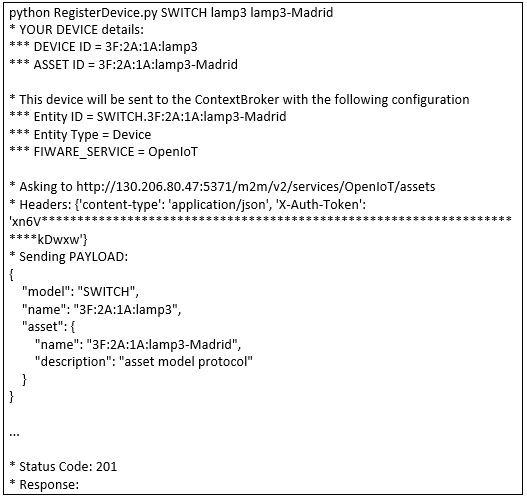
The second thing is to generate a Command and send it to IDAS2.6. This can be done from anywhere in the Internet, but for this example we do it from the RaspberryPI too. You just need to clarify the Asset ID and the command to send.
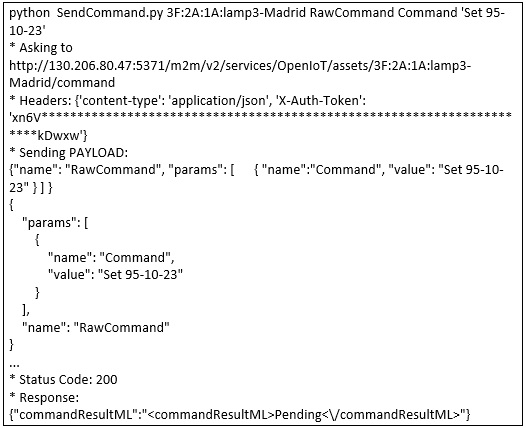
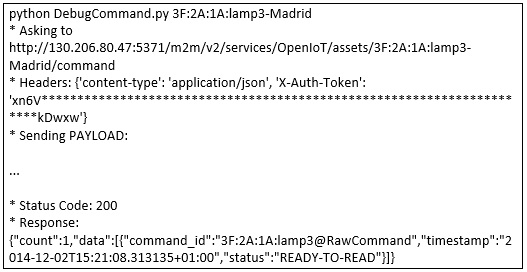
At this point it is useful to understand how IDAS pooling commands work to check the command queue status (also from anywhere) for an specific Asset ID.
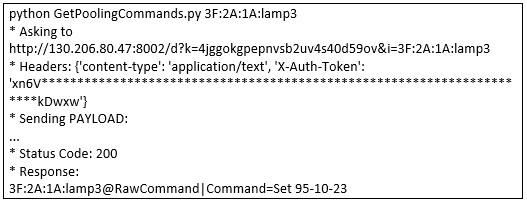
The third step is to collect pending commands from the device (in this case the RaspberryPI). Here we use the Device ID (not the Asset ID) as we target the southbound device API. According to the example description, we should run this every 5 minutes.
Finally, once we’ve got the command we should trigger our command to operate the LED SWITCH with the received command information.
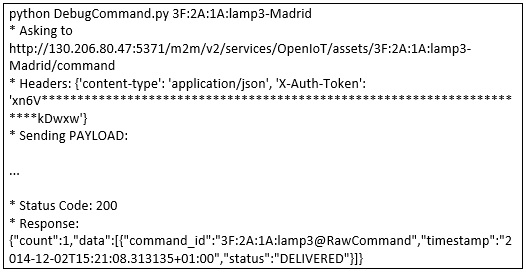
Also, at this point we may check the queue again to see the command has been consumed.
If you are connecting actuators maybe you are not willing to share them publicly, the following section will guide you on that purpose.
What if I do not want to publicly share my IoT devices?
Our recommendation is to practice first by creating a public virtual sensor as explained above.
In this scenario, normally you will deploy your own instance of the ContextBroker, normally deployed with the blueprint facility of the FIWARE Cloud.
After that, just request us (fiware-help@lists.fiware.org) to create your own service “MyServicenameProposal” at IDAS4 plus the details of your ContextBroker (IP address and port).
We will provide you then with the given service name and the API-Key that you only will know, so no other devices will be able to send data. Then simply provide the ContextBroker details and access to your partners developing Apps for you.